Ajax GSP with ZK
Hawk Chen, Engineer, Potix Corporation
January 16, 2012
ZK 5
Introduction
Grails is an open-source web application framework based on the Groovy language. Not just purely a framework, Grails also provides a highly productive development mode including web server, automatic reload of resources and seamless integration with two other best practices, Spring and Hibernate. Grails Server Pages (GSP), which is an evolution from Java Server Pages (JSP) is Grails’ primary view technology.
Compared to JSP, GSP helps simplify implementation procedures and usage of custom tag libraries. It uses "SiteMesh" application framework for page decoration.Please note that only some JavaScript libraries (Prototype and Scriptaculous) can be supported out of the box when utilizing Ajax with GSP. Therefore, developers may have to deal with tedious Ajax details and various JavaScript API integration issues and this is why ZK comes in handy. With the use of a Grails plugin - zkui, developers now empower their level of GSP usage with Ajax by embedding ZK UI components.
This article will demonstrate how ZK can enhance the interactivity of GSP with Ajax. To get a better understanding of this article, it is recommended for readers to know the basic concept of Grails, such as domain class, controller, GSP, and Groovy. The development environment is under Eclipse 3.6, SpringSource Tool Suite 2.7.1., Grails Support 2.7.1., Grails 1.3.7., Groovy-Eclipse Plugin 2.5.1 and zkui 0.3.2.
Ajax GSP with ZK
Prepare Environment
- To create a Grails project, we need an eclipse plugin – SpringSource Tool Suite. Click here to download
- Install Grails Tools, which is a SpringSource Tool Suite extension. Click here to download You must install three items: Grails, Grails Support, and Groovy Eclipse
Application Example Background
We are going to build a simple web application called "RaceTrack". "RaceTrack" is designed for a running club which holds several races. The purpose of this example is to show how users of the running club can easily manage their held races through creating, updating and deleting records.
Create a Project
To create the "RaceTrack" project , use eclipse File\New\Grails Project or SpringSource Tool Suite\Create\Grails Project. You must install the zkui plugin in order to harness the power of ZK components.
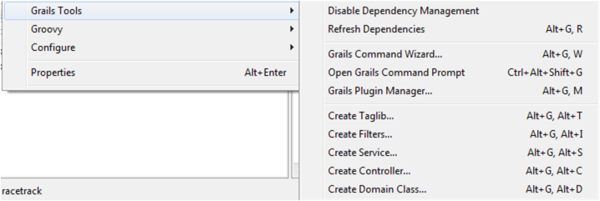
Right click the "RaceTrack" project in Eclipse and hover to Grails Tools. To install the zkui plugin, type “install-plugin zkui” at the Grails Command Prompt window or search it with the Grails Plugin Manager.
You can see the installation message at the Console View. After the plugin is installed, we can start to implement our application.
Create a Domain Class
At the beginning of the implementation process, you have to create a domain class to represent a race and manually add some properties and validation constraint. (Select Grails Tools\Create Domain Class)
class Race {
    String name
    Date startDate
    String city
    Integer distance
    Integer cost
    static constraints = {
		name(blank:false, maxSize:50)
		city(inList:["Taichung","Tainan","Kaohsiung"])
		distance(min:0)
		cost(min:0, max:100)
    }
}
Static Scaffolding
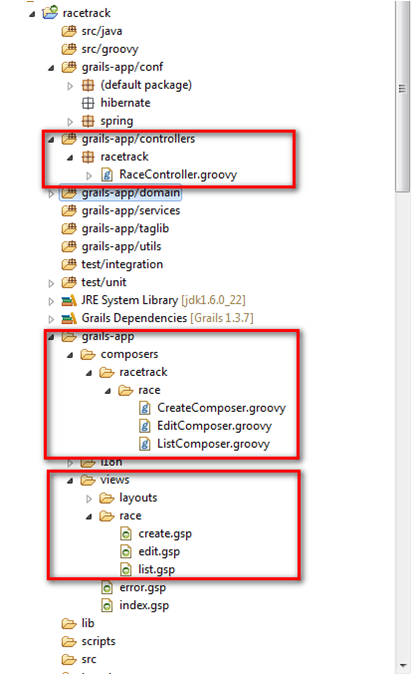
With zkui static scaffolding, we can complete the four basic functions: Create, Read, Update and Delete (CRUD) without writing any code. Type "zkui-generate-all racetrack.Race" at the Grails Command Prompt window and zkui will generate 3 GSPs, 1 controller, and 3 composers (under grails-app\composers). To render ZK components in a GSP, you need to add <z:resources/> in the <head> of grails-app\views\layouts\main.gsp.
Let’s take a closer look at these generated artifacts. The controller class has no big difference with the original Grails controller,but GSP is filled with tags with a prefix “z”. Those tags represent the ZK UI components. The tag name is the component’s name. ZK provides more than 200 components and zkui supports most of them [1] Each GSP has a <z:window> to enclose all ZK components, and the window’s attribute “apply” specifies which composers to handle their events.
<z:window style="padding:5px" apply="racetrack.race.ListComposer">
Hence in list.gsp, the ListComposer will handle events from all components inside <z:window> including the window itself.
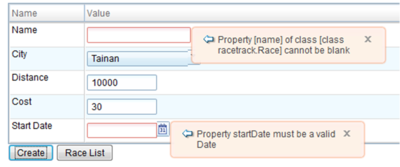
Now, run the application and visit the page via the link http://localhost:8080/racetrack/race/create, you will see a form composed by ZK components corresponding to each Race class’ property. We fill out the form partially and then click the “Create” button. Then we can see the validation message pop-up instantly without reloading the page. Now, this GSP is powered by Ajax.
Among all the generated artifacts, the composers under grails-app\composers are unfamiliar to Grails developers. This term “composer” comes from ZK. It plays the same role as the Grails controller in a MVC pattern, with a difference in which Grails controller handles requests from GSP while the composer of ZK only handles events issued from ZK components. Another notable difference is that the composer can manipulate ZK components on GSP which we will talk about in the next section.
Composer in Depth
There are 3 composers, and each of them corresponds to one GSP which can be easily identified by its naming. Open ListComposer.groovy which handles events from list.gsp. Let’s first look at these variables.
ListComposer.groovy
Grid grid
Paging paging
Longbox idLongbox
It seems normal, but you’ll find that there are three ZK components whose variable names are identical to that of ZK component tag’s id attribute in list.gsp. This is not a coincidence, it is a feature of the composer called component Auto-wiring. It is automatically enabled by mapping a naming convention and a variable type. Each ZK component has a corresponding class (ex: <z:grid> is org.zkoss.zul.Grid), and if you put the correct name and type in the composer upon your component tag, the zkui plugin will wire components for you. Through these variables we can manipulate ZK components in a composer. In fact, static scaffolding has already done it for you.
You can see a closure afterComposer. This closure is called when all ZK components and its descendants are instantiated and rendered. So we usually do some post-processing to components in it.
ListComposer.groovy
def afterCompose = {Component comp ->
        grid.setRowRenderer(rowRenderer as RowRenderer)
        grid.setModel(listModel)
        redraw()
    }
- Line 2 sets a custom row renderer to grid component and this means that we can draw each row by ourselves.
- Line 3 attaches a data source that will be used in the renderer.
Then, we look inside the redraw() method:
ListComposer.groovy
    private redraw(int activePage = 0) {
        int offset = activePage * paging.pageSize
        int max = paging.pageSize
        def raceInstanceList = Race.createCriteria().list(offset: offset, max: max) {
            order('id','desc')
            if (idLongbox.value) {
                eq('id', idLongbox.value)
            }
        }
        paging.totalSize = raceInstanceList.totalCount
        listModel.clear()
        listModel.addAll(raceInstanceList.id)
    }
- Line 4 constructs a race list upon search criteria. The only criterion is the race id which we can retrieve from the ZK component by the use of idLongbox.value, we can get the user's inputted id in the textbox.
- Line 12 changes the Grid’s data source and will cause the grid to re-render.
ListComposer.groovy
    private rowRenderer = {Row row, Object id ->
        def raceInstance = Race.get(id)
        row << {
                a(href: g.createLink(controller:"race",action:'edit',id:id), label: raceInstance.id)
                label(value: raceInstance.name)
                label(value: raceInstance.city)
                label(value: raceInstance.distance)
                label(value: raceInstance.cost)
                label(value: raceInstance.startDate)
                hlayout{
                    toolbarbutton(label: g.message(code: 'default.button.edit.label', default: 'Edit'),image:'/images/skin/database_edit.png',href:g.createLink(controller: "race", action: 'edit', id: id))
                    toolbarbutton(label: g.message(code: 'default.button.delete.label', default: 'Delete'), image: "/images/skin/database_delete.png", client_onClick: "if(!confirm('${g.message(code: 'default.button.delete.confirm.message', default: 'Are you sure?')}'))event.stop()", onClick: {
                        Race.get(id).delete(flush: true)
                        listModel.remove(id)
                    })
                }
        }
    }
We use rowRenderer to customize Grid’s rendering. For example, to create a ZK component dynamically, zkui provides a leftshift (<<) operator to append a child to each row. The id comes from the grid’s data source. According to the code after line 3, you can see how it adds a link, 4 labels, and 2 tool bar buttons (update, delete) in a row.
Instant Deletion
On the second toolbarbutton, the attribute client_onClick allows you to register a client side onClick event handler. The attribute’s value is a snippet of JavaScript to pop-up a confirm dialog box. The prefix client_ is an attribute naming convention to indicate that the event is handled at the client side. The next attribute onClick allows you to register a server-side event handler. This means that when the toolbar button issues an onClick event, a closure will be invoked. If a user clicks the OK button on the confirmation dialog box, the onClick event will propagate to the server and deletes the clicked row from the grid’s data source. This causes the Grid to re-render and then instantly presents the result after deletion without reloading the whole page.
Real Time Searching
ZK also empowers search function. If we type an existing id and click the search button, we can get the search result displayed in the grid immediately.
However, searching the race’s id is not practical in this example, we should search by name instead.
In list.gsp, replace <z:longbox id="idLongbox"/> with <z:textbox id=”keywordBox”/>.
Add a variable Textbox keywordBox in the ListComposer.groovy file.
In the redraw() method:
Comment out the 3 lines of code related to idLongBox and add the following 3 lines:
if (keywordBox.value){
    ilike('name',"%"+keywordBox.value+"%")
}
Now, our search by name is done.
You might think that ZK’s capability ends here? No, we can make the search result display to be more interactive.
Register an onChanging event handler by adding the following code in the ListComposer.groovy file:
void onChanging_keywordBox(InputEvent e) {
	keywordBox.value = e.value
	redraw()
}
The method will be called when the value of keywordBox changes.
Now, we don't even need the search button, you’ll automatically get the search result when typing.
Register an event handler in a composer is to make the method name follow the naming convention:
void [eventName]_[componentId] (Event e){
    …
}
It is quite simple.
Conclusion
Adopting AJAX can reduce a web application's response time thus improving user experience and communication complexity but various JavaScript libraries of AJAX constitutes a barrier for most Grails developers preventing them from using it. However, with ZK, developers are now able to build more interactive applications easily with many ready-to-use components and leave the communication issues behind. See the complete supported component list. In the next article, I will demonstrate how you can combine all the functions of the 3 GSPs into one page.
Reference
- ↑ Grails ZK UI Plugin - Reference Documentation http://xiaochong.github.com/zkui/manual/index.html
Resources
- View the source code
- Download the WAR file
Comments
| Copyright © Potix Corporation. This article is licensed under GNU Free Documentation License. |


